Showing posts with label Swatch. Show all posts

Sunday, October 28, 2012

Korea Haul 2012

Here's another long awaited for blog entry from me. I have not been to Korea recently but all thanks to Mr Funshine who is as lovely as ever, he is the one to help haul these buys back to me.

A nice decent haul. I'm sure the "damage" will be much bigger
if I was there personally.
I came across these LOVELY ME:EX Make Me Star Waterproof Gel Eyeliners in Singapore, although they performed quite well when swatched on my hand, I refused to shell out the money to buy them since it may be another story when applied on my oily eyelids. Since the approximate price comparison between Singapore Face Shop to Korea's is 1 : 2 to 4, I decided to grab all 6 colors that Mr Sunshine could land his hands on.

Six out of the full range of 8 LOVELY ME:EX Make
Me Star Waterproof Gel Eyeliners
I avoid looking like a disco-glitter disaster like I how avoid a plague. However these liners have micro bling that is not noticeable without immense staring, something that I can accept. The Face Shop website recommended to let the drawn liner set for 10 seconds for it to be completely smudge-proof. I tried & tested to find to that is not long enough, a 1 minute wait while to fill in my brows always never fail to to let it set properly.
 

From left to right: #01 Black Cat, #03 Indigo Blue, #04 Disco Purple,
#05 Celebrity, #07 Peach Shower & #08 Moon Silver
This pencils have a good creamy consistency that really set within 1 minute, hence blend & smudge quick. Once it sets, I observe only minor migration of minimal glitter specks with vigorous rubbing. It survive my dish washing test but wear for about 6 hours before smudging to nothingness on my oily eyelids (no primer, setting with dark powder or applying any sealing liquid). That is already a feat as nothing last on my lids more than an hour with no primer, powder or sealant.

I read somewhere that the FACE it Oil Cut Pore Balm is a dupe for Benefit's Dr. Feelgood but as I have not tried Benefit's version personally, I am not able to give any comparison. In short, this product is suppose to help minimise pores or fine lines and control shine due to excessive sebum secretion. From this, we can see that this product is made for people with combination or oily skin. The Face Shop also release a version for dry skin, the FACE it Moisture Pore Balm for your information.  
FACE it Oil Cut Pore Balm

A little swatch for you
This balm is applied after your skincare, sunscreen and just before the foundation, concealer step. Personally, I don't use the sponge that came with it but a stippling brush instead as I feel that the application will be not too heavy and more even. Thereafter, I will use my clean fingers to further blend it in. The product's main ingredient is Dimethicone (which is abit of a controversy) hence a bit of the product will provide a smooth canvas for foundation application. Too much of the balm will make your skin feel too "slippery and greasy", so go easy on it. I like to apply it only on my T-zone and visible pore areas. It carries a slight peppermint-y scent which dissipates quickly and it did keep my face shine-free for a longer period of time, but I will still need to blot some time mid-day.

One more pointer, thorough cleansing before applying these silicone-based primers and proper make up removal is very important at the end of the day. I will suggest double-cleansing with a oil-base make-up removal and followed by your usual cleanser to be sure that all is clean. 

The next item is fast becoming my top favorite foundation. It is the FACE it Oil-Cut BB Emulsion, SPF 20 PA++, 40 ml in a tube. It comes in only one tone (I am a NC25 for MAC Studio line) and has medium to full coverage. I may have a grayish tinge when first applied but it will mellow to skin tone after it settles on my skin. Its oil-control effects is comparable to Revlon Colorstay Foundation (I wear 180 Sand Beige). That's fantastic however it won a niche due to the "lightness" when applied. It does not feel like I have a "layer of something" on my skin.

One important step when applying Blemish Balm (same for foundations or actually, any skincare), always remember to warm up the product before blending or patting onto your skin. Trust me, it helps the product to adhere to your skin much better. It dries down to a complete matt finish however I will still need to dust a layer of setting powder over to make my make up last longer through the day.
FACE it Oil-Cut BB Emulsion

FACE it Oil-Cut BB Emulsion description

FACE it Oil-Cut BB Emulsion

FACE it Oil-Cut BB Emulsion has a nozzle dispenser and
a creamy concealer built-in the cap of the tube
The other foundation Mr Funshine bought buy mistake is the FACE it Oil-Cut Pore Foundation SPF 20 PA++, 35 ml in a bottle. He bought 2 bottles of it in 2 separate Face Shops without noticing that they are different shades, NB 21 and NB 23. NB 21 is more suitable for my skin tone as NB 23 appears a tad too dark.
FACE it Oil-Cut Pore Foundation

FACE it Oil-Cut Pore Foundation
SPF 20 PA++ comes in a hygienic
bottle with a nozzle dispenser 
The Foundation is a more liquid compared to the above mentioned BB Emulsion version. Hence the coverage is lesser than what the BB Emulsion can provide. My skin seem to get shiny faster with this compared to the times when I wear the BB Emulsion. I wished I have better skin so that I can love this foundation as much as I fell for the BB Emulsion, well... I will have to reserve it for weekends and casual days or maybe primer can help.

Below are some swatches, from left to right: FACE it Oil-Cut Pore Foundation NB 21, FACE it Oil-Cut Pore Foundation NB 23, FACE it Oil-Cut BB Emulsion & Concealer that came in FACE it Oil-Cut BB Emulsion .


Spreaded but unblended

The Foundation swatches (2 swatches on the left) dried to a satin
finish and the BB Emulsion dried completely matt.
 The final item item I got from The Face Shop is the FACE it Circle Face Brush. I have not tried this yet as it is not washed yet but my initial thoughts is that we are going to have a love hate relationship. It is so soft and dense to the touch, however it's also quite petite that I dread it will take up more time than I already take prepping in the rush-rush mornings. I may have another review for this if I grow to love it, or let me know if any one of you like to know more.
FACE it Circle Face Brush

FACE it Circle Face Brush information

Side view of FACE it Circle Face Brush

Top view of FACE it Circle Face Brush

Description in FACE it Circle Face Brush instruction slip

FACE it Circle Face Brush instruction for
Liquid Make-up application

FACE it Circle Face Brush instruction for
Powder Make-up application
The final item I got is the Etude House Darling Snail Healing Cream which I will review in time as I need to test the product first, so stay tuned. Apart from all the above that I ordered, Mr Sunshine also threw in quite some other nice little gifts he found befitting during his craze shopping spree . The below is my favorite of all the little gifts, a happy-looking fridge magnet for my own nest in time to come. Thank you Mr Funshine!!!
사랑해요! Wishing all happiness

Wednesday, May 11, 2011

KATE Kanebo 2011 Eye Shadow CQ and JC in Singapore!

KATE Kanebo has released their new range of eyeshadows in Singapore! I was making a major haul when I spotted the new display.
The new display on the top shelve at Watsons

KATE Kanebo Eye Shadow CQ

For the Eye Shadow CQ, I wonder if CQ stands for Crystal Quartz. I only manage to swatch the BR-2 palette (bottom right corner palette) out of the 5 palettes. For more color codes of the rest and how to use them, do click on the link above.

KATE Kanebo Eye Shadow CQ in BR-2, swatch arrangement
according to palette layout
The eyeshadows are pretty fine but the main characteristic of KATE's eyeshadows is that they feel smooth and soft on skin. The above swatch is done with one swipe. Generally, the 3 shades on the right is used to create gradation of your eye-look. Use them for all-over and contouring just as usual. The super shimmery strip on the left, in fact I think it looks like fine diamond dust, can be use over your completed eye-look to jazz up the shine factor. It can be also applied at the inner tear duct area and lightly along the lower lash eye to "liven" up your eyes.

Pigmentation is good in terms of creating the classic, sophiscated yet subtle Japanese eye-looks. These are not to be compared with eyeshadows from brands like Urban Decay, NYX, MAC and etc, they have their own unique traits different from the Japanese brands. I have to highlight, staying-power is weak, please use a primer. Do test them for yourself and go walk around the mall, you'll realise how quickly it fades off leaving a light coat of noticable super-fine glitter.

Along with the Eye Shadow CQ are the Eye Shadow JC, I wonder if JC stands for Jelly Crystal. It's not exactly a jelly but more of a solid-gel consistency. There's eight of them in total and for this range I swatched them all.

KATE Kanebo Eye Shadow JC (left to right):
BR-1, BR-2, GD-1, GY-1

KATE Kanebo Eye Shadow JC swatched indoors,
each swiped once (left to right):
BR-1, BR-2, GD-1, GY-1

KATE Kanebo Eye Shadow JC (left to right):
GN-1, PU-1, PK-1, WT-1

KATE Kanebo Eye Shadow JC swatched indoors,
each swiped once (left to right):
GN-1, PU-1, PK-1, WT-1

KATE Kanebo Eye Shadow JC swatched indoors,
each swiped twice (left to right):
GN-1, PU-1, PK-1, WT-1
Comparing these Eye Shadow JCs, BR-1, BR-2 and GD-1 are the most pigmented. GN-1and PU-1 medium in pigmentation. Last in the list are GY-1, PK-1 and WT-1. Base on my personal opinion, these gel shadows will not last if applied alone. I strongly suggest wearing them over a primer, apply it over eyeshadow to add some luster shine or under powder eyeshadow as a base.

I did not purchase any as I made a huge cosmetic haul recently (still on their way, slowly shipping to me) and I have some similar products in my collection. However that does not mean I will not get some in the future... Hope my entry here did help you in some ways. Do drop by Watsons to test them out if you are interested. Until the my next entry, stay radiant and happy!  

Sunday, May 1, 2011

Make A Eye Catching Splash!

I heard alot about LA Splash which is a brand manufactured in the USA, mostly about raves of their liquid eyeliners and loose pigments. I don't own any of their liners because I think I have enough in my collection at this point of time. Hence today, I will be swatching for you the loose pigment eye shadows I have. They are purchased (both locally and overseas) over a period of time, not in a single haul just in case you are curious.

I de-potted them into stackable jars previously as the pigments seeped into the screw-track of the cap. It was messy business, however it seem to be rectified for the newer jars I bought. From the picture below, you can see that there are some jars still in their original package. These are the ones that I bought just yesterday at Northpoint, where they were have a Sasa sale. They were going for SGD 10 for 2 jars so I happily grabbed 4.

Top to bottom:
LA Splash Splash Proof Sealer (Eyeshadow Sealer/ Base)
Previous purchase of LA Splash Eye Sparkle
Latest purchase of LA Splash Eye Sparkle in their old packaging
LA Splash Diamond Dust Mineral Eyeshadow in their new packaging

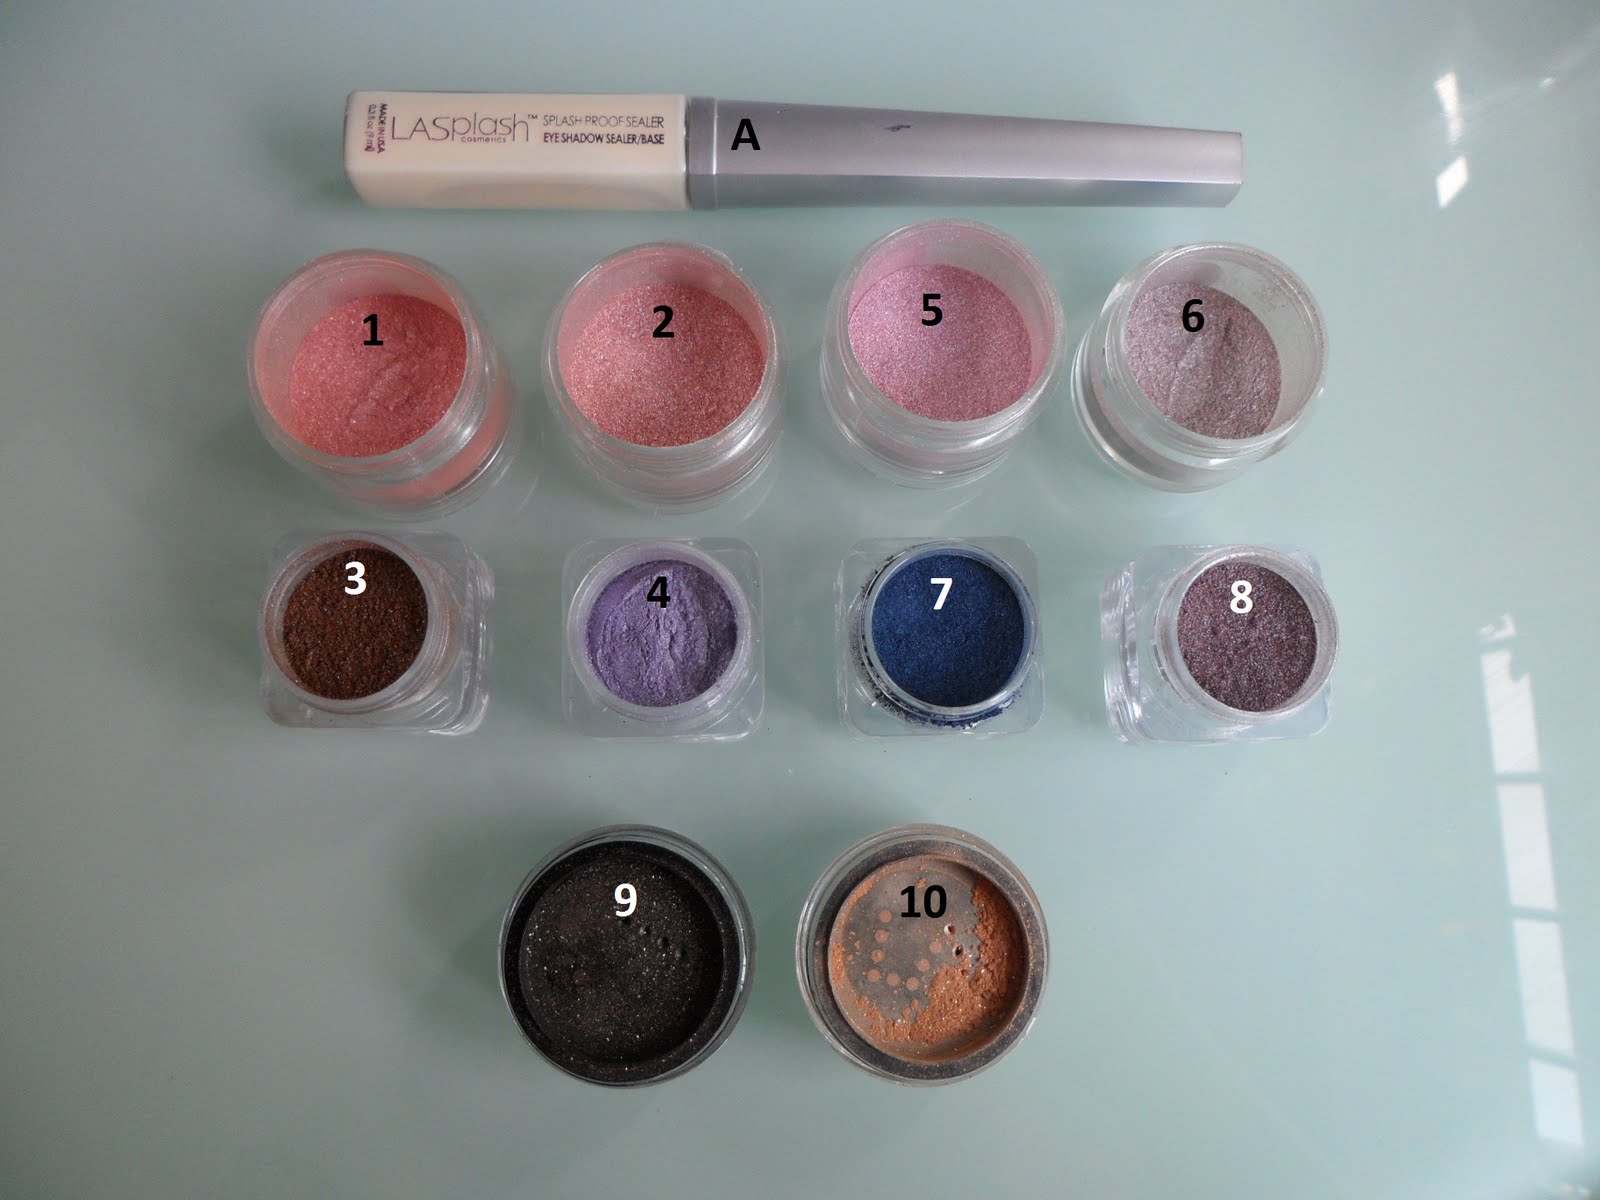
A: LA Splash Splash Proof Sealer (Eyeshadow Sealer/ Base)
1,2,5 and 6: Previous purchase of LA Splash Eye Sparkle
3,4, 7 and 8: Latest purchase of LA Splash Eye Sparkle
9 and 10: LA Splash Diamond Dust Mineral Eyeshadow

Close-up picture 1

Close-up picture 2


Close-up picture 3

I strongly recommend using these with a eyeshadow primer unless you like just a light wash of color or subtle shimmer for your eye looks. You will be able to see the difference in the swatches below on why I emphasis on this, and yes, they do fade as the day pass if used without a primer. Overall, they are fine and soft, gives great pigmentation (if used with primer), very shimmery to metallic and if you can get it on sale, it's quite affordable. One thing great about buying pigments is that you can share it with a friend or two as I personally have not (until this point) hit pan on any full size pigments I have. You can't split and share a compressed eyeshadow if you get what I mean.

However, if you want general comparison between these and the MAC pigments... these are blendable powders on skin when applied, MAC ones feel more like blendable creme. It all depends on personal preferences and the primer you use. So, here are the swatches (Click on photos to enlarge).

Photo taken under sunlight without flash
#1: Starfish Peach
#2: Sunburn Bronze
#5: Seashell Pink
#6: Sandy Beaches


Tilted at an angle

Photo taken under sunlight without flash
#3: Neptune's Mine
#4: Purple Heart
#7: Submarine
#8: Hurricane

Tilted at an angle

 
Photo taken under sunlight without flash
#9: Dragon Dust ( I love this to bits)
#10: Hidden

Tilted at an angle

Under direct sunlight, the true beauty of the sparkle is more than twice that I
managed to capture on this picture.
I find the Diamond Dust series quite chalky and not suited for application with no primer. The primer I'll recommend for these pigments is the one that appeared in a few of the above photos, which is the brand's own LA Splash Eyeshadow Sealer/ Base. It's a translucent white liquid, dries clear and leaves a slightly tacky film.

I love my LA Splash pigments but do take note the method of application. A little tip beforehand, I will always flip any loose powder product container upside down, turn right side up again and give a gentle tap before opening. This is to deposit enough pigment on the cap itself where I will actually take my product from with a brush. Firstly, you will not get to contaminate the whole jar of product and secondly, you have minimal tendency to pick up too much product, making a mess while you go "tap tap tap" off the excess.

For subtle looks, use a dry fluffy brush to apply in with little "wind-swipper" motions and blend. That's all, simple. For pigment intense looks, you may either use a base (one that leaves a slight tackiness works best with these) or wet your brush (however fading will still occur through the day with this method) before applying the pigments. Use a firm flat brush to pick up the shadow and "pat" it onto the eyelid, do not swipe if you want to achieve the intensity as shown in the swatches of my photos. Blending can be done at the edges where you applied the pigments with another clean blending brush at the end.

I hope this is helpful, have a great time experimenting something new everyday! Until then, stay Radiant and Happy!

Sunday, March 27, 2011

My Fanta-Bulous Weekend Part Three!

It's a Sunday, beautiful Sunday! Well, it only means Monday's peeking right over my shoulder, thus I planned to take it easy. The best option was to go shopping and a nice meal in the mall nearest to my place! Yeah, shopping again!

One of my first stop was Watsons, which I'm starting to love again, with must control nowadays. Once again Jade Jade, who completely took after my love for make up, started "exploring" the testers of Majolica Majorca's display counter.

Caught in action...

I must admit, she seem to be immensely enjoying herself

"Oh, which one's nicer..."
Next we had lunch...
At Sake Sushi
I'm not one of those "paranoid extremist" who refuse to eat sushi after the recent, but saddening, tsunami incident in Japan (that brings me to recall a person I once knew that made a fuss and insisted that the doctor gave him the vaccination shot, which were reserved for the pregnant and children at the time of the Bird Flu, because he was not well with a common cold. Come on, you were a 24 year old healthy male, can't believe how you went through your National Service without any guts...)
Some of the dishes: Agedashi Tofu, 揚げ出し豆腐 (left) & Soft-shell Crab Temaki, 手巻

Jade Jade trying to learn how to use the chopsticks

Lobster Temaki

My favourite Beef Kimchi Kaminabe which I've blogged before

Chawanmushi (茶碗蒸し) for Jade Jade

Dragon Roll Sushi

Chicken Katsu Cheese Yaki

Potato koroke (croquette)

Okonomiyaki

Jade Jade finding after-meal entertainment with my Ipad
We continued walking around after lunch before heading to the supermarket for our grocery and headed home. To wrap this entry up, the below is the haul I've done, enjoy!
Guess what I bought...

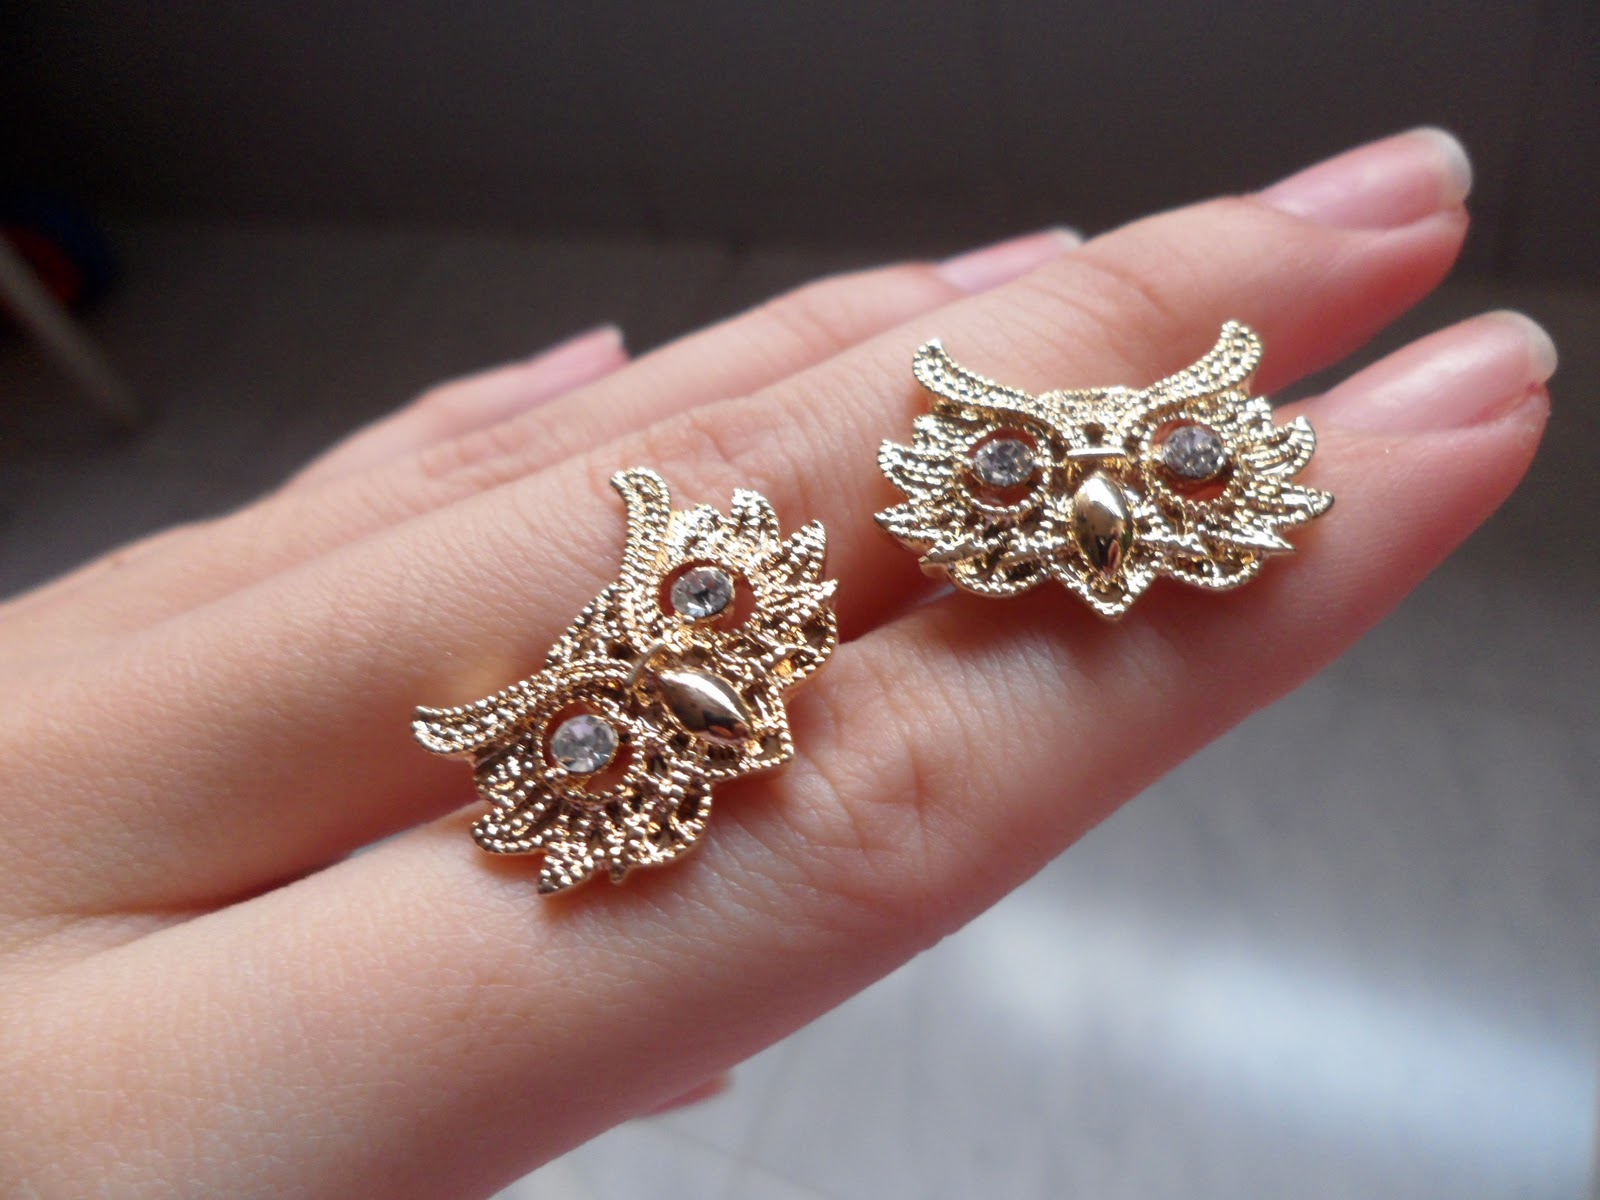
They are very prettly, it was love at first sight

I have a slight fetish for "owl" stuff

See the detailing, this cost me only SGD 14.


Some other stuff I bought randomly: Travel-size Contact Lense Solution (for my office) and Mentos Mint (for Jade Jade)

My haul from Watsons

Eyeshadows: Kate Blendzone in BR-2 (left) and Majolica Marjolica Trick on Powder in BR-752 (right)

I think I have too many nuetrals...
Then I discovered a new shop, which is not really "new" as I have not been shopping for months. It's call Magic Shop. The sales consultant told me that they empahsize on water-based product and is a Taiwan brand that I mistook for Korean. That's something new, without doing any research beforehand, I grabbed a number to their stuff to try out.

The shop's carrier bag

Nail polish at SGD 3.90 each (it was buy 4 get 1 free)

They are not named but numbered (from left to right): #23, #54, #63


#71 (left), #94 (right)

Swatch of #54, 2 coats with Sech Vite Top Coat.

Topped with Daiso's Light Color Nail Enamel #8 by Minmax@New York to add interest.
Reminds me of the starry sky on a clear night.

Magic Shop Luxurious Lip Gloss: It's colorless in the tube but turns
 into a healthy pink stain once in contact with your lips. Comes in one
shade (Chameleon Pink) at SGD 24.
 

Ingredient List

I have used 2 of the nail polish shades that I bought (#54 & #63). They are quite pigmented, 2 coats will give the color as the bottle. However, I notice that they started chipping much faster that the rest of other brands that I use. It normal last about 2 to 3 days before the first chip appear. You may like to know, I type but not alot at work, I don't do lots of household chores and I used Sech Vite Quick Dry as my top coat. Hope that clarifies. Therefore I'm not really impress with their polishes.

On the other hand, I love the Luxurious Lip Gloss, which is a lip stain. It's watery in texture, gives a slightly cooling sensation once applied and you can witness your lips turn pinker within the minute. Do note that it does have a soft rose-scent as well, which I love. I've used it for a whole week & still loving it. I'm not "glowy" recently so the pop of lovely rosy hue on my lips gave my face some "life" and I'm lazy, I only have to reapply around 4 to 6 hours later (depending on how much you talk and if you are drinking or eating). So hassle free and it does not dry out my lips.

I'll definitely step in again if I pass by the shop. I hope it open a few more branches so the girls who do not stay around my area can get to try out this new brand at their convinence as well.

That's all for this three-parter. Until next time, take great care!


Showing posts with label Swatch. Show all posts

Sunday, October 28, 2012

Korea Haul 2012

Here's another long awaited for blog entry from me. I have not been to Korea recently but all thanks to Mr Funshine who is as lovely as ever, he is the one to help haul these buys back to me.

A nice decent haul. I'm sure the "damage" will be much bigger
if I was there personally.
I came across these LOVELY ME:EX Make Me Star Waterproof Gel Eyeliners in Singapore, although they performed quite well when swatched on my hand, I refused to shell out the money to buy them since it may be another story when applied on my oily eyelids. Since the approximate price comparison between Singapore Face Shop to Korea's is 1 : 2 to 4, I decided to grab all 6 colors that Mr Sunshine could land his hands on.

Six out of the full range of 8 LOVELY ME:EX Make
Me Star Waterproof Gel Eyeliners
I avoid looking like a disco-glitter disaster like I how avoid a plague. However these liners have micro bling that is not noticeable without immense staring, something that I can accept. The Face Shop website recommended to let the drawn liner set for 10 seconds for it to be completely smudge-proof. I tried & tested to find to that is not long enough, a 1 minute wait while to fill in my brows always never fail to to let it set properly.
 

From left to right: #01 Black Cat, #03 Indigo Blue, #04 Disco Purple,
#05 Celebrity, #07 Peach Shower & #08 Moon Silver
This pencils have a good creamy consistency that really set within 1 minute, hence blend & smudge quick. Once it sets, I observe only minor migration of minimal glitter specks with vigorous rubbing. It survive my dish washing test but wear for about 6 hours before smudging to nothingness on my oily eyelids (no primer, setting with dark powder or applying any sealing liquid). That is already a feat as nothing last on my lids more than an hour with no primer, powder or sealant.

I read somewhere that the FACE it Oil Cut Pore Balm is a dupe for Benefit's Dr. Feelgood but as I have not tried Benefit's version personally, I am not able to give any comparison. In short, this product is suppose to help minimise pores or fine lines and control shine due to excessive sebum secretion. From this, we can see that this product is made for people with combination or oily skin. The Face Shop also release a version for dry skin, the FACE it Moisture Pore Balm for your information.  
FACE it Oil Cut Pore Balm

A little swatch for you
This balm is applied after your skincare, sunscreen and just before the foundation, concealer step. Personally, I don't use the sponge that came with it but a stippling brush instead as I feel that the application will be not too heavy and more even. Thereafter, I will use my clean fingers to further blend it in. The product's main ingredient is Dimethicone (which is abit of a controversy) hence a bit of the product will provide a smooth canvas for foundation application. Too much of the balm will make your skin feel too "slippery and greasy", so go easy on it. I like to apply it only on my T-zone and visible pore areas. It carries a slight peppermint-y scent which dissipates quickly and it did keep my face shine-free for a longer period of time, but I will still need to blot some time mid-day.

One more pointer, thorough cleansing before applying these silicone-based primers and proper make up removal is very important at the end of the day. I will suggest double-cleansing with a oil-base make-up removal and followed by your usual cleanser to be sure that all is clean. 

The next item is fast becoming my top favorite foundation. It is the FACE it Oil-Cut BB Emulsion, SPF 20 PA++, 40 ml in a tube. It comes in only one tone (I am a NC25 for MAC Studio line) and has medium to full coverage. I may have a grayish tinge when first applied but it will mellow to skin tone after it settles on my skin. Its oil-control effects is comparable to Revlon Colorstay Foundation (I wear 180 Sand Beige). That's fantastic however it won a niche due to the "lightness" when applied. It does not feel like I have a "layer of something" on my skin.

One important step when applying Blemish Balm (same for foundations or actually, any skincare), always remember to warm up the product before blending or patting onto your skin. Trust me, it helps the product to adhere to your skin much better. It dries down to a complete matt finish however I will still need to dust a layer of setting powder over to make my make up last longer through the day.
FACE it Oil-Cut BB Emulsion

FACE it Oil-Cut BB Emulsion description

FACE it Oil-Cut BB Emulsion

FACE it Oil-Cut BB Emulsion has a nozzle dispenser and
a creamy concealer built-in the cap of the tube
The other foundation Mr Funshine bought buy mistake is the FACE it Oil-Cut Pore Foundation SPF 20 PA++, 35 ml in a bottle. He bought 2 bottles of it in 2 separate Face Shops without noticing that they are different shades, NB 21 and NB 23. NB 21 is more suitable for my skin tone as NB 23 appears a tad too dark.
FACE it Oil-Cut Pore Foundation

FACE it Oil-Cut Pore Foundation
SPF 20 PA++ comes in a hygienic
bottle with a nozzle dispenser 
The Foundation is a more liquid compared to the above mentioned BB Emulsion version. Hence the coverage is lesser than what the BB Emulsion can provide. My skin seem to get shiny faster with this compared to the times when I wear the BB Emulsion. I wished I have better skin so that I can love this foundation as much as I fell for the BB Emulsion, well... I will have to reserve it for weekends and casual days or maybe primer can help.

Below are some swatches, from left to right: FACE it Oil-Cut Pore Foundation NB 21, FACE it Oil-Cut Pore Foundation NB 23, FACE it Oil-Cut BB Emulsion & Concealer that came in FACE it Oil-Cut BB Emulsion .


Spreaded but unblended

The Foundation swatches (2 swatches on the left) dried to a satin
finish and the BB Emulsion dried completely matt.
 The final item item I got from The Face Shop is the FACE it Circle Face Brush. I have not tried this yet as it is not washed yet but my initial thoughts is that we are going to have a love hate relationship. It is so soft and dense to the touch, however it's also quite petite that I dread it will take up more time than I already take prepping in the rush-rush mornings. I may have another review for this if I grow to love it, or let me know if any one of you like to know more.
FACE it Circle Face Brush

FACE it Circle Face Brush information

Side view of FACE it Circle Face Brush

Top view of FACE it Circle Face Brush

Description in FACE it Circle Face Brush instruction slip

FACE it Circle Face Brush instruction for
Liquid Make-up application

FACE it Circle Face Brush instruction for
Powder Make-up application
The final item I got is the Etude House Darling Snail Healing Cream which I will review in time as I need to test the product first, so stay tuned. Apart from all the above that I ordered, Mr Sunshine also threw in quite some other nice little gifts he found befitting during his craze shopping spree . The below is my favorite of all the little gifts, a happy-looking fridge magnet for my own nest in time to come. Thank you Mr Funshine!!!
사랑해요! Wishing all happiness

Wednesday, May 11, 2011

KATE Kanebo 2011 Eye Shadow CQ and JC in Singapore!

KATE Kanebo has released their new range of eyeshadows in Singapore! I was making a major haul when I spotted the new display.
The new display on the top shelve at Watsons

KATE Kanebo Eye Shadow CQ

For the Eye Shadow CQ, I wonder if CQ stands for Crystal Quartz. I only manage to swatch the BR-2 palette (bottom right corner palette) out of the 5 palettes. For more color codes of the rest and how to use them, do click on the link above.

KATE Kanebo Eye Shadow CQ in BR-2, swatch arrangement
according to palette layout
The eyeshadows are pretty fine but the main characteristic of KATE's eyeshadows is that they feel smooth and soft on skin. The above swatch is done with one swipe. Generally, the 3 shades on the right is used to create gradation of your eye-look. Use them for all-over and contouring just as usual. The super shimmery strip on the left, in fact I think it looks like fine diamond dust, can be use over your completed eye-look to jazz up the shine factor. It can be also applied at the inner tear duct area and lightly along the lower lash eye to "liven" up your eyes.

Pigmentation is good in terms of creating the classic, sophiscated yet subtle Japanese eye-looks. These are not to be compared with eyeshadows from brands like Urban Decay, NYX, MAC and etc, they have their own unique traits different from the Japanese brands. I have to highlight, staying-power is weak, please use a primer. Do test them for yourself and go walk around the mall, you'll realise how quickly it fades off leaving a light coat of noticable super-fine glitter.

Along with the Eye Shadow CQ are the Eye Shadow JC, I wonder if JC stands for Jelly Crystal. It's not exactly a jelly but more of a solid-gel consistency. There's eight of them in total and for this range I swatched them all.

KATE Kanebo Eye Shadow JC (left to right):
BR-1, BR-2, GD-1, GY-1

KATE Kanebo Eye Shadow JC swatched indoors,
each swiped once (left to right):
BR-1, BR-2, GD-1, GY-1

KATE Kanebo Eye Shadow JC (left to right):
GN-1, PU-1, PK-1, WT-1

KATE Kanebo Eye Shadow JC swatched indoors,
each swiped once (left to right):
GN-1, PU-1, PK-1, WT-1

KATE Kanebo Eye Shadow JC swatched indoors,
each swiped twice (left to right):
GN-1, PU-1, PK-1, WT-1
Comparing these Eye Shadow JCs, BR-1, BR-2 and GD-1 are the most pigmented. GN-1and PU-1 medium in pigmentation. Last in the list are GY-1, PK-1 and WT-1. Base on my personal opinion, these gel shadows will not last if applied alone. I strongly suggest wearing them over a primer, apply it over eyeshadow to add some luster shine or under powder eyeshadow as a base.

I did not purchase any as I made a huge cosmetic haul recently (still on their way, slowly shipping to me) and I have some similar products in my collection. However that does not mean I will not get some in the future... Hope my entry here did help you in some ways. Do drop by Watsons to test them out if you are interested. Until the my next entry, stay radiant and happy!  

Sunday, May 1, 2011

Make A Eye Catching Splash!

I heard alot about LA Splash which is a brand manufactured in the USA, mostly about raves of their liquid eyeliners and loose pigments. I don't own any of their liners because I think I have enough in my collection at this point of time. Hence today, I will be swatching for you the loose pigment eye shadows I have. They are purchased (both locally and overseas) over a period of time, not in a single haul just in case you are curious.

I de-potted them into stackable jars previously as the pigments seeped into the screw-track of the cap. It was messy business, however it seem to be rectified for the newer jars I bought. From the picture below, you can see that there are some jars still in their original package. These are the ones that I bought just yesterday at Northpoint, where they were have a Sasa sale. They were going for SGD 10 for 2 jars so I happily grabbed 4.

Top to bottom:
LA Splash Splash Proof Sealer (Eyeshadow Sealer/ Base)
Previous purchase of LA Splash Eye Sparkle
Latest purchase of LA Splash Eye Sparkle in their old packaging
LA Splash Diamond Dust Mineral Eyeshadow in their new packaging

A: LA Splash Splash Proof Sealer (Eyeshadow Sealer/ Base)
1,2,5 and 6: Previous purchase of LA Splash Eye Sparkle
3,4, 7 and 8: Latest purchase of LA Splash Eye Sparkle
9 and 10: LA Splash Diamond Dust Mineral Eyeshadow

Close-up picture 1

Close-up picture 2


Close-up picture 3

I strongly recommend using these with a eyeshadow primer unless you like just a light wash of color or subtle shimmer for your eye looks. You will be able to see the difference in the swatches below on why I emphasis on this, and yes, they do fade as the day pass if used without a primer. Overall, they are fine and soft, gives great pigmentation (if used with primer), very shimmery to metallic and if you can get it on sale, it's quite affordable. One thing great about buying pigments is that you can share it with a friend or two as I personally have not (until this point) hit pan on any full size pigments I have. You can't split and share a compressed eyeshadow if you get what I mean.

However, if you want general comparison between these and the MAC pigments... these are blendable powders on skin when applied, MAC ones feel more like blendable creme. It all depends on personal preferences and the primer you use. So, here are the swatches (Click on photos to enlarge).

Photo taken under sunlight without flash
#1: Starfish Peach
#2: Sunburn Bronze
#5: Seashell Pink
#6: Sandy Beaches


Tilted at an angle

Photo taken under sunlight without flash
#3: Neptune's Mine
#4: Purple Heart
#7: Submarine
#8: Hurricane

Tilted at an angle

 
Photo taken under sunlight without flash
#9: Dragon Dust ( I love this to bits)
#10: Hidden

Tilted at an angle

Under direct sunlight, the true beauty of the sparkle is more than twice that I
managed to capture on this picture.
I find the Diamond Dust series quite chalky and not suited for application with no primer. The primer I'll recommend for these pigments is the one that appeared in a few of the above photos, which is the brand's own LA Splash Eyeshadow Sealer/ Base. It's a translucent white liquid, dries clear and leaves a slightly tacky film.

I love my LA Splash pigments but do take note the method of application. A little tip beforehand, I will always flip any loose powder product container upside down, turn right side up again and give a gentle tap before opening. This is to deposit enough pigment on the cap itself where I will actually take my product from with a brush. Firstly, you will not get to contaminate the whole jar of product and secondly, you have minimal tendency to pick up too much product, making a mess while you go "tap tap tap" off the excess.

For subtle looks, use a dry fluffy brush to apply in with little "wind-swipper" motions and blend. That's all, simple. For pigment intense looks, you may either use a base (one that leaves a slight tackiness works best with these) or wet your brush (however fading will still occur through the day with this method) before applying the pigments. Use a firm flat brush to pick up the shadow and "pat" it onto the eyelid, do not swipe if you want to achieve the intensity as shown in the swatches of my photos. Blending can be done at the edges where you applied the pigments with another clean blending brush at the end.

I hope this is helpful, have a great time experimenting something new everyday! Until then, stay Radiant and Happy!

Sunday, March 27, 2011

My Fanta-Bulous Weekend Part Three!

It's a Sunday, beautiful Sunday! Well, it only means Monday's peeking right over my shoulder, thus I planned to take it easy. The best option was to go shopping and a nice meal in the mall nearest to my place! Yeah, shopping again!

One of my first stop was Watsons, which I'm starting to love again, with must control nowadays. Once again Jade Jade, who completely took after my love for make up, started "exploring" the testers of Majolica Majorca's display counter.

Caught in action...

I must admit, she seem to be immensely enjoying herself

"Oh, which one's nicer..."
Next we had lunch...
At Sake Sushi
I'm not one of those "paranoid extremist" who refuse to eat sushi after the recent, but saddening, tsunami incident in Japan (that brings me to recall a person I once knew that made a fuss and insisted that the doctor gave him the vaccination shot, which were reserved for the pregnant and children at the time of the Bird Flu, because he was not well with a common cold. Come on, you were a 24 year old healthy male, can't believe how you went through your National Service without any guts...)
Some of the dishes: Agedashi Tofu, 揚げ出し豆腐 (left) & Soft-shell Crab Temaki, 手巻

Jade Jade trying to learn how to use the chopsticks

Lobster Temaki

My favourite Beef Kimchi Kaminabe which I've blogged before

Chawanmushi (茶碗蒸し) for Jade Jade

Dragon Roll Sushi

Chicken Katsu Cheese Yaki

Potato koroke (croquette)

Okonomiyaki

Jade Jade finding after-meal entertainment with my Ipad
We continued walking around after lunch before heading to the supermarket for our grocery and headed home. To wrap this entry up, the below is the haul I've done, enjoy!
Guess what I bought...

They are very prettly, it was love at first sight

I have a slight fetish for "owl" stuff

See the detailing, this cost me only SGD 14.


Some other stuff I bought randomly: Travel-size Contact Lense Solution (for my office) and Mentos Mint (for Jade Jade)

My haul from Watsons

Eyeshadows: Kate Blendzone in BR-2 (left) and Majolica Marjolica Trick on Powder in BR-752 (right)

I think I have too many nuetrals...
Then I discovered a new shop, which is not really "new" as I have not been shopping for months. It's call Magic Shop. The sales consultant told me that they empahsize on water-based product and is a Taiwan brand that I mistook for Korean. That's something new, without doing any research beforehand, I grabbed a number to their stuff to try out.

The shop's carrier bag

Nail polish at SGD 3.90 each (it was buy 4 get 1 free)

They are not named but numbered (from left to right): #23, #54, #63


#71 (left), #94 (right)

Swatch of #54, 2 coats with Sech Vite Top Coat.

Topped with Daiso's Light Color Nail Enamel #8 by Minmax@New York to add interest.
Reminds me of the starry sky on a clear night.

Magic Shop Luxurious Lip Gloss: It's colorless in the tube but turns
 into a healthy pink stain once in contact with your lips. Comes in one
shade (Chameleon Pink) at SGD 24.
 

Ingredient List

I have used 2 of the nail polish shades that I bought (#54 & #63). They are quite pigmented, 2 coats will give the color as the bottle. However, I notice that they started chipping much faster that the rest of other brands that I use. It normal last about 2 to 3 days before the first chip appear. You may like to know, I type but not alot at work, I don't do lots of household chores and I used Sech Vite Quick Dry as my top coat. Hope that clarifies. Therefore I'm not really impress with their polishes.

On the other hand, I love the Luxurious Lip Gloss, which is a lip stain. It's watery in texture, gives a slightly cooling sensation once applied and you can witness your lips turn pinker within the minute. Do note that it does have a soft rose-scent as well, which I love. I've used it for a whole week & still loving it. I'm not "glowy" recently so the pop of lovely rosy hue on my lips gave my face some "life" and I'm lazy, I only have to reapply around 4 to 6 hours later (depending on how much you talk and if you are drinking or eating). So hassle free and it does not dry out my lips.

I'll definitely step in again if I pass by the shop. I hope it open a few more branches so the girls who do not stay around my area can get to try out this new brand at their convinence as well.

That's all for this three-parter. Until next time, take great care!